Creating Weekly Video Series
Back when I was at Zombie Studios we would release updates for Blacklight: Retribution. Anyone that has worked on or played a live multiplayer game sees release notes and patch updates, but I wanted to take it a step further, thus the creation of Blacklight: Retribution Patch Minute, which later evolved into the Zombie Studios Update. This provided some personality and much easier for press to pick up on the highlights and talk about it. I thought I'd write down the basic setup, processes, and goals of doing these videos series.
Filming
The hardware was pretty stright forward and most of it was either owned by a staff or cheap enough to buy outright.
- Canon 60D DLSR
- Canon 35mm f/1.4
- Canon 40mm f/2.0
- Tamron 24-70mm f/2.8
- 2 Rode smartLav Lavalier Mics
- Two LED Light Panels
- Tripods
- Adobe Premiere
- Adobe After Effects
- PluralEyes 3
Script
Since episodes were typically under 10 minutes long, having some type of script was important, even if it was just an outline or notes. Each episode before we started to film we would just go over it really quick, figure out pacing and the beats we really wanted to play up. It didn't hurt having people who could ad lib if needed.
Filming
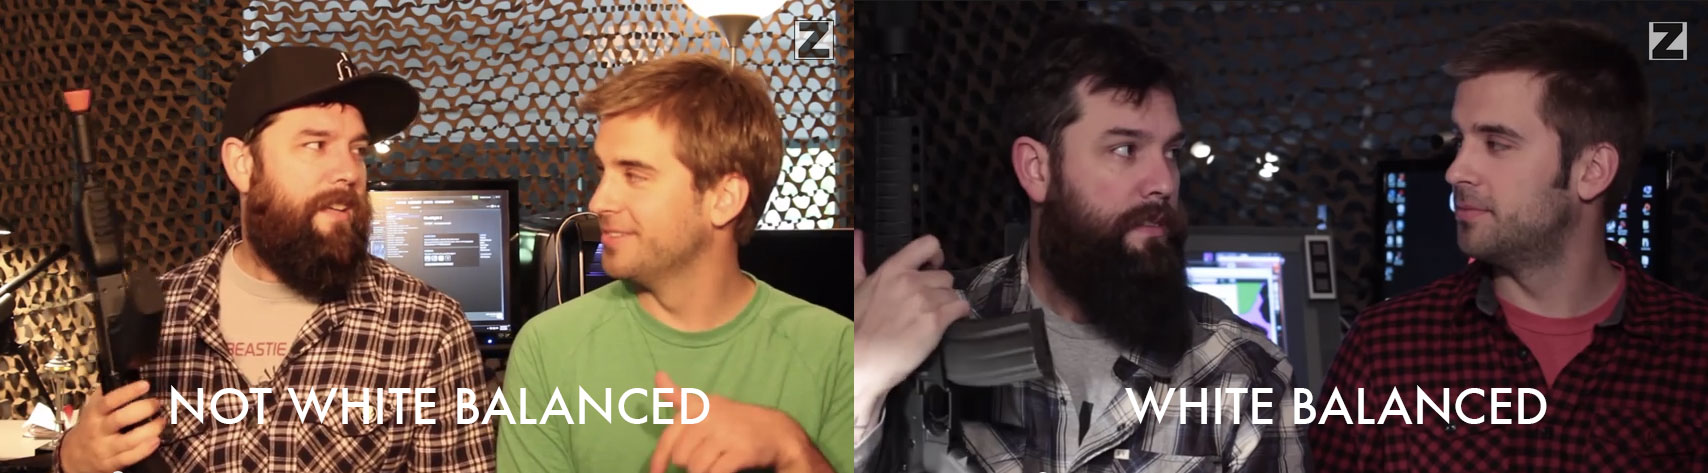
All video was shot in 1080p30 mode and white balanced via a sheet of standard white printer paper. Lens selection varied to who was on screen. Filming at f/1.4 provided a great look, but if subjects moved even a little bit they would become out of focus. Filming with the DSLR and a prime lens provided a nice clean look. Even with our thrown together set, it still got the job done and at a quality bar that was solid.
Lighting
Lighting was always a challenge due to the limited places to film in the office. Rooms with lots of natural light had too much ambient noise or were in use. Other areas were dark. We tried various lighting options, sometimes even just normal office lamps. In some of the earlier episodes you can see the color temp going into the orange. Not the desired look, but it is what we had. It wasn't until later that we got some on-camera LED light panels, which gave us a nice white light.
Audio
Audio is another thing we struggled with in early episodes. We just used the built in mic on the camera. While this worked, it picked up everything! From the air ventilation system, near by computers, traffic outside, or staff walking by. You could hear it all. When we started getting a real lavalier mic system was just not in the budget, and I really didn't want to use a boom or shotgun mic, so we let it slide.
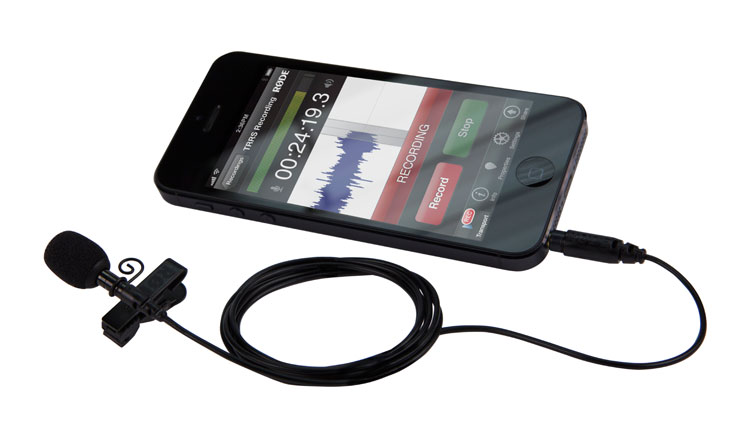
It wasn't until near that end that I found the Rode smartLav, which are lavalier mics that you plugin into your iPhone and record on it. Once we had those it was simple to sync the external audio source with PuralEyes.
Editing
Episodes were edited in Adobe Premiere CC, which was super simple. Filming was done in one to three takes, so there was actually very little timeline editing needed. Premiere was mostly used to build the timeline of other assets such as intro, outro, sync external audio via PluralEyes, lower thirds and other videos.
Intro Graphics
The intro was built in After Effects CC with custom music done internally by our sound department. The original intro was way too long, over 15 seconds, so we cut it down drastically by the later episodes. The intro was saved out as a 1080p30 40 mbps MP4/AAC to use in the Premiere timeline. This made it easy to build a template timeline in Premiere so I could just stack footage into it.
Lower Thirds
Lower Thirds and other graphics were also done in After Effects. I broke down and just bought a template with the motion I liked on VideoHive. The one I bought had all the graphics I needed including name lower thirds, center text and image wipe. Since episodes typically had two people, I had to be somewhat creative as majority of the lower thirds animated from the left to center and then back to left. To get around this I would flip the text in After Effects and then in Premiere I would add an effect with -100 on X on the composition. This would giving me a mirror right to center to right animated lower third. There is probably a better way to do it, but this worked. Since the lower third graphics rarely changed, I ended up rendering them out as a PNG image sequence. Each person had a folder with their name with right or left. I looked into saved templates for each person or a Quicktime with transparency, but these killed my rendertime, sometimes doubling it. So PNG image sequence saved me a lot of time and headaches.
Outro
The first episode just ended abruptly, because this is typically how you cut video. But Youtube is different beast and after looking at other videos and what they were doing, we added sometimes up to an additional 30 seconds from a previous trailer or episode. This was to allow for annotations. This was pretty easy with an After Effects project I built with two videos and a background with the main panel either answering questions or telling the watcher to check out one of the linked videos.
Output
Each episode was rendered out at 1080p30 10 mbps. We tried a couple episodes at 25 mbps, but really couldn't notice the difference. Given the varied devices and environments fans would be watching it as well, 10 mbps was more than adequate. Timelines and footage were archived for potential use at a later date.
Uploading & Promotion
Episodes were uploaded to YouTube, but placed in unpublished state. This gave us a final review on YouTube before it was automatically sent to subscribers. There were a couple times that we found some last minute errors this way. Once the episode was given the thumbs up, a quick blog post was written up and the video was embedded into the blog post. That link was then shared on Twitter and Facebook. This was so fans would come to our site for information and hopefully read more of our content or sign up for our newsletter.
Additionally having a "package" that press could pick up on was something that happened as well. We found that press were more likely to report on an update or announcement when done in a short video. Previous press would only report on things if we had something with weight, say a new mode or level, and even then we would have to have screenshots. It was just easier to show video and talk about it. It worked out well for everyone.
Start to Finish
It took a little to get the pace, but after the transition from Blacklight Minute to Zombie Update, episodes were filmed, edited, post and published in under 90 minutes. Since we had little to no approval process we were able to cut a lot of corners which allowed us to be very time sensitive. We could make a tweet for questions, and that person could have an answer later that day.
Live Stream vs Recorded
Live Streaming is all the rage right now, and even when I was at Zombie you could see it turning into something huge. At the time we decided to do a recorded episodes as that is what we had available to us at the time. Though even if I were to do it all over again, I'd still go with recoded episodes since it is easier for users to digest the information as well as press willingness to publish a story about the content within the update. There is a huge difference between a 5 minute video and a 90 minute video.
Closing
In the end this was a fun project. It provided an entertaining and informative outlet for our team versus doing a bulleted list on a blog. Additionally the easy exposure to press added a great deal of value. With studios like Naughty Dog, Insomniac Games, Hi-Rez, Crytek, and Riot all doing video updates of some sort, that more studios will look into video to deliver to their audience.