Road to Setting Up Ghost
When I found out about Ghost, I figured I'd look into it since I was also doing some messing around with NodeBB, both of which run on nodeJS. I was able to do some messing around with local setups using Bitnami, which is great for a single download and setup for trying it out on your local machine, but I wanted to have a live instance that I could share with others, so I started looking at my options.
I have been running Shinyidol since 2004, and have changed hosts a number of times. Looking at my current host, they don't have any way of running nodejs on their machines, so Ghost running on my current host was out of the question. Looking further into my options, I could have ran on my Amazon Web Services account, but that was going to be $20/month, which was a little too much for messing around with new technology. Then I stumbled on DigitalOcean, which has a $5/month Cloud Server, which is perfect for what I needed. They even have a one click setup to run Ghost. After 10 minutes I was running Ghost.
Since I am already running Shinyidol, I really didn't want to redirect that domain name to my new server, so I figured I'd just get a new domain. This is always a pain because you have to think of something. After doing some digging, I found that GoDaddy was selling .US domains for $2.99 for the first year. That was cheap enough for me just to grab shinyidol.us for my Ghost blog.
In all it probably took 30 minutes to setup the Ubutnu box on DigitalOcean, register the domain, redirect the name servers, and edit a couple config files in Ghost, and I had a running Ghost blog.
Below I'll explain in further detail on how to get it all running.
Setup on Digital Ocean
First thing you need is a host that can run nodejs. As I said above, DigitalOcean is probably the most cost effective option currently if you want to have a web accessable blog. Sign up for their $5/month account, then create your server using the pre-configured Ghost setup in the Application Images.
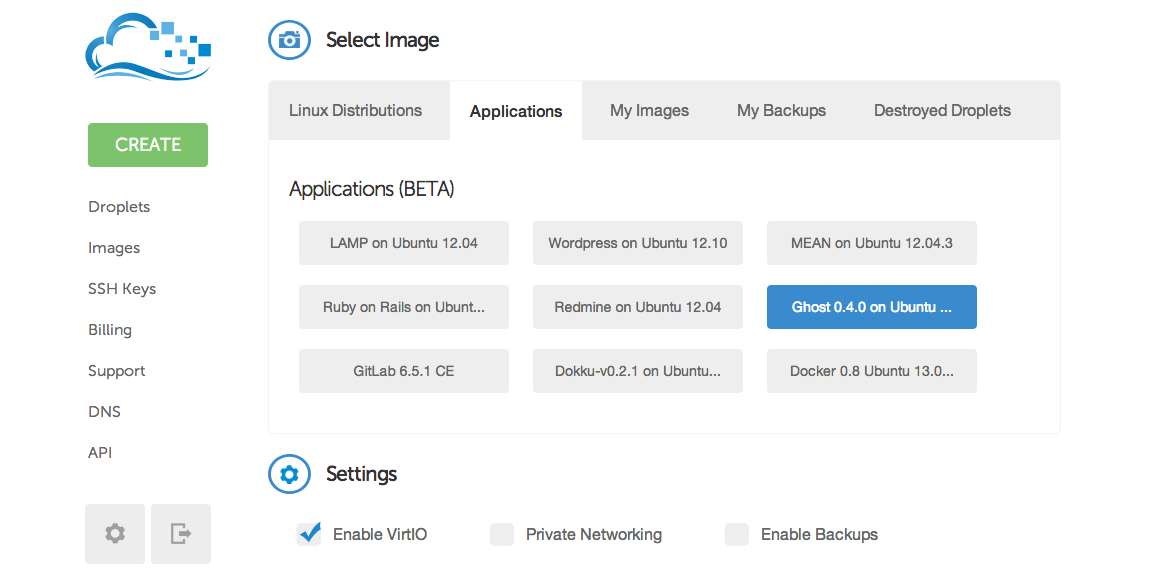
Just give your name a droplet name, click on Applications, select Ghost 0.4 on Ubuntu, keep Enable VirtIO, and click Create. 60 seconds later, you have box running Ghost, but to an IP address.
Register Domain
Now you need a domain, if you don't have one already. I just ended up grabbing at .US domain which are cheap.
Name Servers
Now that you have your domain you need to have the proper name servers. This pretty much tells your domain to go to the IP of the server.
You are going to have to change this on DigitalOcean as well as on your domain register.
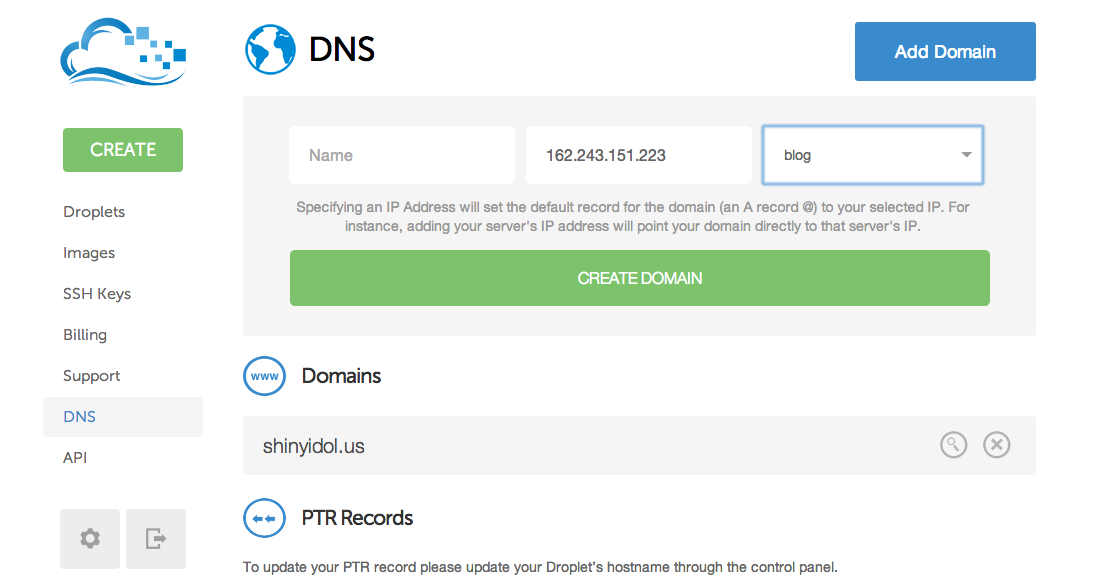
On DigitalOcean, just click on DNS, click on Add Domain. This will let you select your Ghost droplet and will autofill the IP address of the server. For the name just type in your domain. Now you will need to add the following Name Servers (NS).
- NS1.DIGITALOCEAN.COM
- NS2.DIGITALOCEAN.COM
- NS3.DIGITALOCEAN.COM
Click save and you are done the first step.
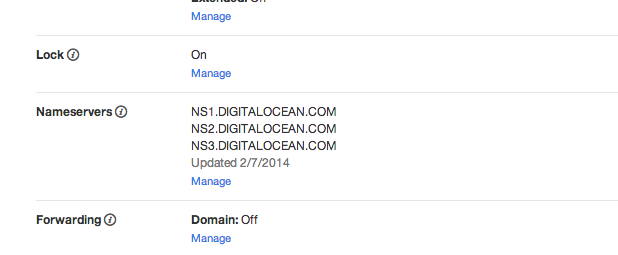
Next you have to go to your name register. Since I did mine with GoDaddy, this will show you how to update it on their website. Login and click on Manage Domains. Click on the domain you wish to use. Click on Manage in Nameservers. Click on Custom to rediect to your own nameservers, then add the following.
- NS1.DIGITALOCEAN.COM
- NS2.DIGITALOCEAN.COM
- NS3.DIGITALOCEAN.COM
Click save and you are now directing all the nameservers to the proper places.
Ghost Config
Now that you have the internet knowing where your Ghost blog will be, you need to tell Ghost as well. This is probably the most complicated part, depending how you do it. Most guides tell you to use nano, which is the native linux text editor. I found this to be a pain, so I just ended up using Putty or another SFTP program to upload edited files.
First you need to update the nginx config. You will have to get access to /etc/nginx/conf.d/default.conf. Change the server_name from my-ghost-blog.com to your new domain, example shinyidol.us.
Now you have to edit the Ghost config files for it to know where to go. Go to /var/www/ghost/config.js and search for Production:, under that you will see a url: and just update it to your domain, example http://shinyidol.us.
Once you update those files you will now need to restart Ghost. To do this you can telnet into the machine via SSH and run the command, service ghost restart. Once it has restarted it will say OK. And with that you are done. Go to url.com/ghost and sign up your account and you have a working Ghost blog on your new domain.
Adding Comments
Ghost doesn't have commenting native to the application, and most people are using Disqus which lets you sign up for free. Just sign up for an account, from there it will allow you to add Disqus to your website. It is important if you plan on having multiple sites to name this properly. Just click save.
Now you have to add the Disqus code to your blog, so commenting will show up. You will have to update the post.hbs file with the Universal Code from Disqus.
There are some Ghost themes out there that have this built in, but you will have to update a file to point to the correct Disqus account.
If you change any files in Ghost, you do have to restart it, so just SSH into your server again and run service ghost restart.
Good Luck
Hopefully this guide is helpful! Have fun using Ghost. It is still early, with a fair amount of things missing that would make it easier, such as analytics, Ghost API for plugins, and an importer from other platforms. Even with these missing, it looks to be a great platform for simple publishing.